How to Link Our Product XML or CSV Feed to Your Website
nicole@syntech.co.za2024-06-14T09:48:15+02:00
Product XML or CSV files contain detailed information about our products, including pricing, descriptions, and images, and can be linked to your website to ensure that your customers always have information that is kept up to date. In this blog post, we’ll walk you through the steps to link our product XML feed to your website and help you make the most of this tool.
For customers using WooCommerce:
To start, you will need access to an import-export plugin for WordPress & WooCommerce. We recommend using WP ALL IMPORT. This is a paid plugin that can be used for multiple different kinds of imports. It has a paid addon for WooCommerce, which is also the shopping cart platform for WordPress that we recommend: http://www.wpallimport.com/order-now/. The WooCommerce bundle comes to a once-off lifetime fee of $149.
From there, the plugin will need to be installed onto your website either by uploading it through the WordPress admin area, via FTP or by asking your web developer to install it for you.
Once both plugins are installed and activated you will see an All-Import option in your WordPress admin menu [the black bar on the left-hand side]. By clicking on it, you will start the process of setting up a new Import.
Follow the steps below for the XML/CSV integration walkthrough for WordPress/WooCommerce.
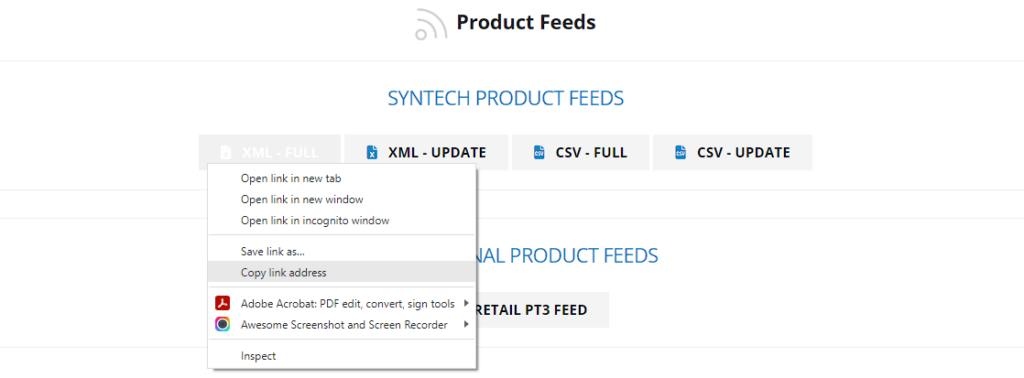
Step 1. Login to your account at https://www.syntech.co.za/my-account/. From there, go to XML Feeds on the left.
Right-click and select “Copy link address” on any of the URLs on that page. (XML or CSV – they will both achieve the same purpose but we will be using the XML in this walkthrough).

Make sure you select WooCommerce Products in the import setup.

Step 2. Shows what will be imported.
Step 3. This is where all the information needed will be dragged and dropped.
If you want to make use of both Cape Town and Joburg stock, you can make use of the following formula: [array_sum(array({cptstock[1]},{jhbstock[1]}))]
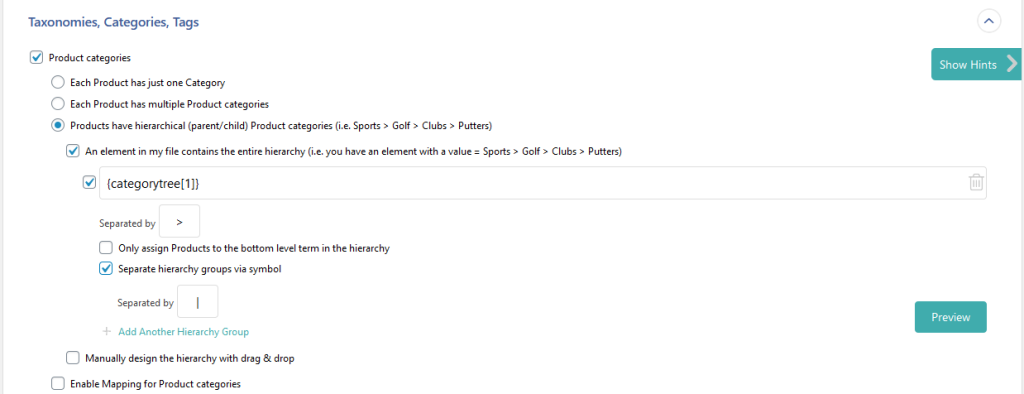
If you want to map all your product categories as listed on the Syntech XML/CSV feed, you will need to ensure that your category structure is mapped as shown below

Once you have mapped everything the way you would like it and have proceeded to the next step, it will ask for a unique identifier for which I would use the SKU. (The SKU will be a field in the CSV/XML feed).

There are also scheduling options that you can set here:
Automatic – which is based on an internal WordPress CRON that triggers depending on users visiting the site – as the WordPress itself needs to load before any of its internal scheduling can happen – hence it needs to be visited.
Manual – This would be for CRON JOBS on your hosting platform (a far better technique that will automatically run server-side irrelevant of whether anyone visits the site or not).
The next step is to run the import and see how your products have all imported.
We have not included any attributes as you can take this and expand on it as you see fit, you do not need to use the template and can map the data however you want it to work.
You may find the following links helpful for any queries you may have:
http://www.wpallimport.com/documentation/recurring/cron/ & http://www.wpallimport.com/documentation/ for any other general queries.
For customers using Shopify:
To import Syntech products to your Shopify store, use our walkthrough below:
We recommend using a paid plugin called Syncee which can be found in the Shopify store. Syncee is a paid plugin that you will need to pay for if you want to use it.
Here’s the basic Syncee app Shopify walkthrough:
- Step 1. Install the Syncee App on your Shopify website
- Step 2. Access the Syntech XML/CSV feed: https://www.syntech.co.za/my-account/feeds/
- Step 3. Link to our XML feed in the Syncee app and map the header fields
- Step 4. Sit back and relax while your website updates itself with the latest products from Syntech.
With the help of paid plugins like WP All Import for WooCommerce or Syncee for Shopify, integrating Syntech products into your WooCommerce or Shopify store is a straightforward process. By following the step-by-step walkthroughs provided, you can automate product imports and ensure that your online store stays up-to-date with the latest offerings from Syntech.
As you familiarize yourself with the plugins and their functionalities, you can further customize the product mapping and scheduling options to suit your specific needs. Remember to consult the relevant documentation and support resources for any queries or issues that you may encounter during the integration process.
We hope you find this guide helpful for importing Syntech products to your online store.
Last updated – 03/01/2024


